Xak: The Art of Visual Stage for MSX
Walkthrough by Tsunami
Map of the Northern
part of Wavis |

Walkthrough |
You start off outside your home in Fearless. Since your mom Salia is busy, you go outside to see if there’s something to do. When you go and visit your friend Alice at the mayor’s house, she asks you to find her grandfather’s glasses. She tells you he has lost them in church, so go look over there. After you have brought back these glasses, the mayor will read to you a message brought to you by the king’s messenger; Pixie. She’ll ask you to go on a quest to save Wavis from Badu. Naturally you accept. Pixie then tells you to go to Fort Molum since it’s on the way to the king’s castle. From Pixie you receive a royal crest and from the mayor some cash to help you on your way as a warrior; it’s time to get some battle gear! When you go shopping in Fearless for the first time you have to explain that you have become a young warrior.
Be sure to try your battle skills and gain some experience before heading east to Fort Molum. In general, don’t advance before the creatures you come across don’t give you any more experience. Xak is in general quite hard and bosses almost always require good stats and skill to battle.
After checking the fort for the first time it appears that everybody has gone. Monsters have invaded the place but you’re not able to do a thing because you can’t get in anywhere (The people locked most places for security reasons). So you decide to head back and take a look in the forest which is along the way back to Fearless.
Here you find a hermit’s home and a little further on… a girl who seems to be injured. You take her to the nearby house. Here, her dad sees she’s hurt pretty bad. So her dad asks you to take her to the hospital back in Fearless. You carry the girl (Fray) back to the village and bring her to the hospital. Then to reassure Fray’s dad you go back to tell him she’s in good hands. Fray’s dad then tells you about the forest’s Guardian Spirit (the Grand Tree), who’s become evil. It’s time to kick some butt. After exorcising the evil presence from the Grand Tree, you go back to Fray’s dad. He tells you a story he overheard. After hearing that story you decide to go back to Fort Molum.
You now find a man in a small room. He has shut himself in. The man seems to be hurt and asks you to find some medicine. The depot is just next to the room he’s in but the door is closed. So you go find the key. You go upstairs and find it on one of the shelves in the eastern part of the fort.
Back in the depot you find a remedy. When you give it to him he is grateful and asks you what has happened. Furthermore he asks you to prove you are indeed on a mission for the king. So you show him the royal crest. After he sees that, he believes you and gives you the master key to the doors in the fort.
Now go on and explore the fort. In the west wing you can find a book on strategy on one of the bookshelves (raises you Strength and Defence). You can also find a chest with a letter along side it. On it there’s a request for the person who finds it to deliver the chest to Fell Bow in Banuwa Village. You can decide to take it or leave it. Both scenarios are possible. In it there’s a Xak Dipole. You can’t open it for quite some time. If you don’t decide to take it, you’ll get that Xak Dipole some other way. In this case you decide to take it along.
You also find another man who has locked himself in. In his hurry he forgot to take food with him. The man is absolutely famished and asks you to bring him some soup. So you go back to the east wing to get some soup from the kitchen. The soup can be found in a pot over the fire. It’s near where you found the key for the depot. After you bring him his soup, he too wants some proof of your quest for the king. So you once again show your royal crest.
Now the time has come to search through the northern part of the fort. Here you find the exit but it appears to be locked. Go back to the man you brought soup to. He tells you that door can be opened with a hydraulic system. He gives you the key to the room where the lever for that hydraulic system is.
When you find the room from where it’s operated you discover that there still is a man operating it. You ask him to open the door; he agrees but only if you prove to him your allegiance to the king. He then agrees to set the system in motion. But it appears the water pressure can’t be lowered. He thinks something is blocking the water flow from the tank. So you go and check out what that obstruction is. Now’s a good time to save. A tough battle is at hand.
It’s a giant Water dragon. After disposing of this dragon you also check out a statue which is in the same room. Duel’s spirit appears to reside in the statue. He tells you, you aren’t ready to battle Badu yet. In order to stand a chance at slaying him, you have to gather the three Xak Dipoles. Duel gives you the Blue Xak Dipole.
After this you go back to the man who operates the lever. He opens the door for you. Onwards to the castle or so you think. The high road to the castle has collapsed. Bell Well tells you he has destroyed the road, so the castle couldn’t be invaded by monsters. He also tells you about an alternative path to the castle. This path can be found near Normana. Not knowing where Normana is you decide to go back to Fearless.
On your way there you find Bobby who’s hurt. He’s behaving strangely and you don’t trust him; after you say you won’t take him back the Shapeshifter changes to his original form. You slay the Shapeshifter and go on to Fearless to check on Fray. She’s now cured and gives you a ring as a reward. Now for Normana… You go on to the west and have to go through the venomous marsh. Be sure your level is high enough. If it is not you need to regain life at a safe point in the marsh.
In Normana the villagers tell you you can get to the caves with a sort of elevator. First you can’t use it. Ask the mayor for permission and instructions. You also buy some disintegrate scrolls from Katula because you hear rocks may obstruct your way through. Pixie also seems to have followed you to Normana. Down in the caves you find a man. He tells you he has fallen in a trap set by the people of Normana by accident. You help him out and he tells you his name is Zuun, before teleporting to Normana. Oh no, you made a mistake; Zuun was a monster who the villagers had imprisoned in the caves. So you hurry back to Normana to save the villagers from Zuun. Zuun asks you to join him and conquer Wavis, but you decline and send him to kingdom come.
All the villagers will return to the village from their hiding places when you return to the village again. Pixie tells you about a man who was looking for Latok. As a reward for slaying Zuun, the mayor of Normana gives you an ESP Medal as a reward. Now that you’ve corrected your mistake you go back to the caves and find a pirate lair. At the docks you find a pirate who wants his rum very badly. You decide to check out the lair and here you find a bottle on the table. He still wants more so you get him another bottle of rum (also on a table). When he has finished the second bottle he decides to give you the treasure key. In the chests you find a red gem.
Being fed up with the pirates you go to the caverns inthe west. At some point the cave seems to come to a dead end. But you see a symbol on the wall and when you use the ESP Medal you see a doorway you can get through. Here you find the first of three Rock biters who guard the road to the castle. He asks you a royal sign so you show him your crest. In the next part of the cave you once more find a sign on the walls and you use the ESP Medal again. Again a Rock biter asks you to show the royal crest. He lets you go past. You’re surprised to find two tough Elementals behind him. After snuffing out both Elementals, you come to a gate guarded by Pik-Solom, who’ll only let you get past if you use the guiding gem. So you show the red gem and are on your way. The last of the three Rock biters asks you once again to show the royal crest. After that you get to pass him and you arrive in Nemnu Village. But first a déjà vu (demo) of all the things you have seen on your adventure till now.
In Nemnu village you meet Yui, whose brother
went into Zeglard Tower. The mayor also tells you you have to get through
the tower and enter the land of flames in order to slay Badu. Be sure to talk
to Neemay. This dwarf knows how to avoid traps. But information comes at a
price. Also the people talk about a strange black cloaked man, probably the
same as Pixie saw earlier. Talking about Pixie… Pixie has once again
followed you here.
On your way to Zeglard tower you meet a warrior who’s just put up camp.
It’s Rune Greed, another God’s Descendent. He tells you he’ll
slay Badu thanks to his Great Sword (and he points out you only have a puny
weapon). Not one to get discouraged, you enter the Zeglard tower.
Some floors up you come across a ghost who tells you he’s under a spell of his own making. He needs a dispel scroll to return to his original form. So you go look for one. On the next floor you find a family of gnomes who live in a treasure chest. Their daughter has gone missing. Being the hero your are you decide to go look for her. Wasn’t there a strange moving skull some floors down? You backtrack a bit and behold… Chim the little girl gnome was indeed playing in that skull. Once reunited with mother and father, you are rewarded with a dispel scroll.
Off to the ghost you go and you hand the dispel scroll over to him. He turns back to his former self and then teleports back to Nemnu. You follow him back to Nemnu. Here you find him again, Kane the Mage. As a reward he gives you a squirrel (Rabby is its name). Kane tells you he’s a good mascot.
So now you go back to the tower with renewed hope. After some more climbing you finally come across a skeleton. When you examine the remains you discover that its soul hasn’t ascended yet. The skeleton asks you to relay a message to Yui. Back to Nemnu you go with the bad new. Back at the town you find out that Pixie has been abducted by the man in the black cloak. You hurry back to free Pixie. Along the way you once again stop at the remains of Yui’s body. You get a broad sword as a reward for relaying the message.
On the very top of the tower you finally meet up with the man in the black cape; Necromancer! He uses the power of Badu to summon creatures to fight in his stead. After you have destroyed his army of the undead, he tries to persuade you to switch sides. You decline wholeheartedly and he teleports out of there. Now you go on and you reach the Land of Flames.
Walking about heading east in this Land of Flames you find a cavern. Here people are hiding from all the monsters. They have recently invaded the land and the Fortress of Flames. Here you find Rachel. She tells you about her sick little baby brother. Her father has gone to the Fortress of Flames to get some medicine. He hasn’t come back though. Latok volunteers to go after him. Rachel gives you a fire cape; now you can enter the Fortress of Flames.
In the fortress you find a gas mask in the barracks. In the western part you discover a room which is shrouded in gas. Here you can also find a plate mail. On the next floor having gone through a passage filled with gas, you discover a staircase. You can’t climb the staircase; something is obstructing the way. You decide to go back and take another route.
You find an entrance to a room with lava
streams. Here you find Rachel’s dad, who has probably fainted because
of the gas. But soon after you enter, you hear the bridges collapsing. Rachel’s
dad tells you he’ll operate the mechanism to get you out of there and
gives you the medicine. You go back to Rachel to give her the medicine and
you explain what has happened.
The people in the cavern have fled the Fortress of Flames. It stands to reason
they know more about it. Therefore Latok asks them what’s up with the
staircase. The guy next to Rachel tells you, you have to extinguish the fire
in the chimney. He also says that it’s imperative to get the dragon
ring. Without it you won’t be able to cross the Sea of Magma. The bard
in the cave should have it, but he appears to have lost it when he fled from
the monsters. He left it in his bed.
Back in the fortress you go check out the barracks. You see something under the bed but you can’t reach it. So you tell Rabby to get the ring. Afterwards you go to the chimney in the main hall on the first floor. You put out the fire with the cups of water on the mantle piece. You now can go to the third floor. Here you’ll find the Red Xak Dipole if you decided not to take the chest addressed to Fell Bow with you. If you did take it, the chest will be unlocked when you are in a certain room on the third floor; the heat melts the ice lock on the chest and you take the Red Xak Dipole from it.
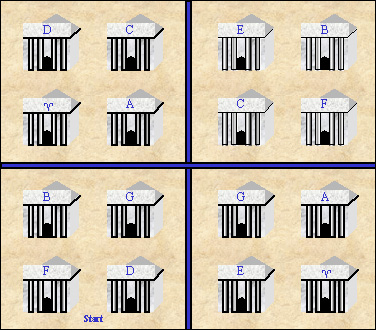
From this very room you also use the dragon ring to call out the Blue Dragon. He flies you across the Sea of Magma. Just before arriving at the mountain where you need to slay Badu you come across a Red Dragon called Salamander. He’s blocking your way. Time to extinguish his flame. You safely land on the mountain but you see someone who hasn’t been so lucky; Rune Greed!! He’s gotten hurt fighting Salamander. In this state he can’t handle Badu. Therefore he gives you the Green Xak Dipole and his Great Sword. He also tells you how the following maze works. You only get to enter each temple once! Otherwise everything starts over. You have to enter the temple with the sign of the beast last. You’re teleported to temples of the same letter. The sequence is:
F —»C —»D—» B—» E—»Blue Crest OR A —»C—» F—» G—» E—» B—» D—»Blue Crest |
You then are transported to the cave where Badu resides. Just before entering, Duel tells you to align your Dipoles. You now have the power of force shot and can go in to slay Badu.